

In this tutorial you will master all about the branching statements such as break, continue and return in Java with simple examples. Also you will see how the labelled and unlabelled control statements work. So far we have learned some basic programs in java and on analysing these programs we know that each program follows a linear execution, that means one statement after the other. But in some cases, the programmer wants to direct the control to some other sections of statements rather than to the nearest one,based on some logical conditions. In such conditions the programmer relies on branching statements like break, continue and return. The break and continue statement can be tied with a label or without a label.
In Java Language among the 50 keywords, break is the most commonly used keyword along with loop. The break statement is used to either skip or terminate a block of codes or a loop execution series immediately in situations where we are not sure about the number of iterations required or if some particular conditions are met. A break statement is formed when the keyword break is followed by a semicolon.
The syntax is as follows:
break;
More often , the break keyword is accompanied with a switch statement. The break statement exits each switch case one after another. Following example illustrates the use of the break in switch statement.
public class Signal{

public static void main(String[] args) {
int colour = 2;

switch (colour) {
  case 1:
    System.out.println("Green light!proceed driving");
    break;
  case 2:
    System.out.println("Orange light! proceed with caution");
    break;
  case 3:
    System.out.println("Red Light! stop driving");
    break;
  }
}
This example gives you the output “ Orange light! proceed with caution” as the variable colour holds the value 2. The switch statement will look case by case until it reaches case 2 to give the desired output and then the break statement terminates that block.
An unlabelled break statement usually terminates the loop in which the break statement resides.The break statement is mostly used with if statements in loops and switch cases. Initially we can see how the break statement works in loops to break the loop control.

To make it more clear, see below code snippet and observe how for loop control terminates while encountering a break statement.
class UnlabelledBreakInForLoop {
     public static void main(String[] args) {

        for (int i = 1; i <= 3; i++) {
            for (int j = 1; j <= 3; j++) {
                if (i == 2 ) {
                    break ;
                }
                System.out.printf("i = %d, j = %d%n", i, j);
            }
        }

    }

}
Output:
i = 1, j = 1
i = 1, j = 2
i = 1, j = 3

i = 3, j = 1
i = 3, j = 2
i = 3, j = 3
In this example we have provided a condition, if i = 2 then it should break the loop. it is obvious that an unlabelled break statement terminates the innermost loop. As you can see from the output, the break statement terminates the inner loop associated with value 2.
class UnlabelledBreakInWhileLoop{
    public static void main(String[] args) {
       int i = 1;
       while (i<=10) {
            if(i==5) {
                break;
            }
       System.out.println(i*i);
        i=i+1;
        }
       System.out.println("Loop breaks and comes out of the loop ");
    }
}
Output:
1
4
9
16
Loop breaks and comes out of the loop
Similarly we can use the break statement in a do-while loop.
class UnlabelledBreakInDoWhileLoop{
    public static void main(String[] args) {
       int i = 1;
       do{
            if(i==5) {
                break;
            }
            System.out.println(i*i);
            i=i+1;
        }  while (i<=10);
       System.out.println("Loop breaks and comes out of the loop ");
    }
}
Output:
1
4
9
16
Loop breaks and comes out of the loop
A break statement that ties with a label is commonly termed a Labelled break statement. The labelled break statement terminates the entire labelled section in one go. A labelled section starts from the point where labelling starts and ends when the label follows a break statement. The syntax of a labelled break statement is as follows:
break label;
A Labelled break is mostly used in nested loops where it becomes handy to terminate an outer loop and there is no need to wait to finish the entire execution. As we all know, an unlabelled break exits from the loop in which it resides which always will be the innermost loop while a labelled break statement terminates the deep nested set of loops (outer loops).
Following example will give you the insight on how a labelled break works in a nested loop.
class LabelledBreakInForLoop {
     public static void main(String[] args) {

        Outer:
        for (int i = 1; i <= 3; i++) {
            for (int j = 1; j <= 3; j++) {
                if (i == 2 ) {
                    break Outer ;
                }
                System.out.printf("i = %d, j = %d%n", i, j);
            }
        }
      System.out.println("Exited from label");
    }

}
Output:
i = 1, j = 1
i = 1, j = 2
i = 1, j = 3
Exited from label
Now to understand this example in a better way just recall the example of an unlabelled break statement which we studied earlier and do a comparison. Here, when the condition , i=2 is met, the entire loop is terminated and the statement immediately after the loop is executed. Similarly, the labelled break acts on the while and do-while loop.
The other important keyword used in JAVA language to control the execution is continue, which skips some portion of execution and continues with the rest. The continue statement is always accompanied with decision making statements like if , if ..else etc. Unlike break, the continue statement never ends the execution of the loop; rather it skips the execution of the portion where the particular condition is satisfied and continues the execution of the remaining loop. The syntax of the continue statement is as simple as follows:
continue;
Like break, we can think of continue in two forms : Unlabelled Continue and Labelled Continue.
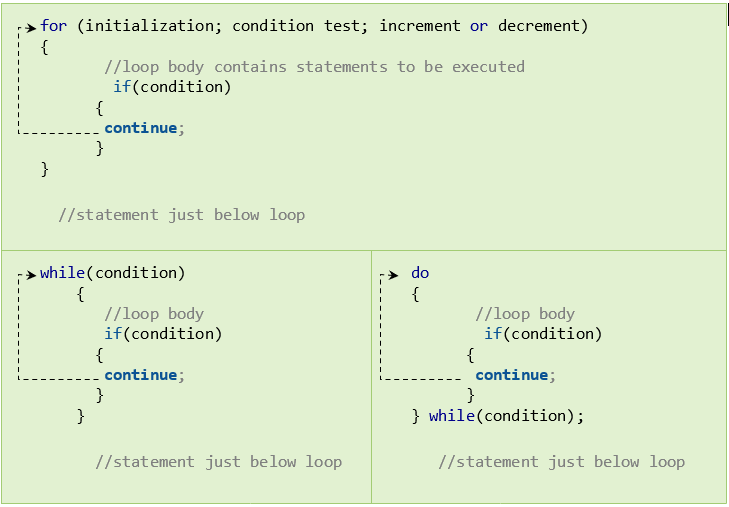
In this case the block of codes written after 'continue' will not execute when the specified condition inside the if statement returns true. The control shifts back to the next iteration and the remaining execution will occur till the loop exits.
Here is an example program to print even numbers between 1 and 15, the loop will be like this :
Suppose we want to print odd numbers between 1 and 15, the loop will be like this :
public class ContinueInWhileLoop {

   public static void main(String args[]){
 int i=1;
 while (i<=15)
 {
           if (i%2!=0)
           {
         i++;
        continue;
           }
           System.out.print(i+" ");
           i++;
 }
   }
}
Output:
1
3
5
7
9
11
13
15
Note that we have given 'i' an initial value 1. In the first cycle 'for' checks whether the value of i is lesser or equal to 15 or not. As 1<15, the code inside the loop will execute where the if statement checks whether the value of i when divided by two will leave the remainder zero or not. Since i%2 is not equal to zero ,it prints the value 1. Then the value of 'i increments' from 1 to 2 when it passes i + +.
Now 'for' checks again and finds 2<10 and control moves to if which checks 2%2 and the remainder received is zero, the condition becomes true and the continue statement will skip the code below it and continue with incrementation.
Similarly, 3,4,....till 15 is evaluated and produces the output as in the snippet. In short, if the condition in the if statement is true, then continue skips the printing of the output and if it is false continue follows the printing statement and prints the result.
public class ContinueInWhileLoop {

   public static void main(String args[]){
 int i=1;
 while (i<=15)
 {
           if (i%2!=0)
           {
         i++;
        continue;
           }
           System.out.print(i+" ");
           i++;
 }
   }
}
Output:
2 4 6 8 10 12 14
public class ContinueInDoWhileLoop {

   public static void main(String args[]){
 int i=1;
 do
 {
           if (i%2!=0)
           {
         i++;
        continue;
           }
           System.out.print(i+" ");
           i++;
 }while (i<=15);
   }
}
Output:
2 4 6 8 10 12 14
Another kind of continue that works well in java, especially when working with nested loops, is the labelled continue statement. The syntax of the labelled continue statement is as follows:
continue label;
Labelled continue statement is always escorted with nested loops. The reason for this is pretty clear that when the depth of nesting is high the complexity of the program is high and execution time is also comparatively long. To skip the execution of a particular outer loop the most simple and convenient way is to tie the outer loop with a label and use it along with the continue statement.Examine the following example:
class LabelledContinueInForLoop {
     public static void main(String[] args) {

        Outer:
        for (int i = 1; i <= 3; i++) {
            for (int j = 1; j <= 3; j++) {
                if (i == 2 ||j==3 ) {
                    continue Outer ;
                }
                System.out.printf("i = %d, j = %d%n", i, j);
            }
        }
      System.out.println("Exited from label");
    }

}
Output:
i = 1, j = 1
i = 1, j = 2
i = 3, j = 1
i = 3, j = 2
In this nested loop , we have initialized the value of i and j to 1 and the limit for both i and j is set to 3.
for loop checks whether the value of i is lesser or equal to 3 or not. As 1<3, the code inside the loop will execute where we encounter another for loop. Again, for loop checks whether the value of j is lesser or equal to 3 or not . Here is also 1<3 , so the code inside the inner loop executes where the if statement is evaluated. Here 1 is not equal to 2 or 1 is not equal to 3 hence the if statement is false so the control shifts to the outer statement of if and prints the value of i as 1 and j as 1.Then the value of j increments' from 1 to 2 when it passes j+ +.
Now the inner loop proceeds the execution with the value of j as 2 and for loop check again 2<3. then the control moves to if to check if 2 is equal to 3 which evaluates to false and hence the output is printed. Afterwards again the value of j is incremented to 3 when it passes j++.
This cycle is a bit different, here j holds the value 3 . Even though the for loop evaluates to true , it fails to meet the condition provided in the if statement and hence the code inside the if statement executes, which is the continue statement. That means the current execution is skipped and it moves to the next where the value of j increments to 4.
Now the value of i is incremented to 2 since the inner loop exceeds the limit. Again the the same process continues and till both for loop exits . Now try yourself with other cycles to understand this better.
The final branching or jumping statement in java is the return. Like break and continue , return is also a reserved keyword in java used to control the flow of execution. A return statement often comes along with a method and it exits from the current method and shifts the control flow to the method to which it was invoked. The return statement can be used in two ways:
The syntax of a return statement that doesn’t return a value is as follows:
return;
The syntax of a return statement that returns a value is as follows:
return sum;
See below example to verify the working of return statement :
public class Calc {

     int Add(int a,int b)
    {
        int sum = a+b;
        return sum;
    }

  void Mul(int a,int b)
    {
        int prod = a*b;
        System.out.printf("Product = %d\n",prod);
        return;
    }

    public static void main(String[] args) {
    Calc c =new Calc();

    System.out.printf("Sum = %d\n",c.Add(10, 20));

    c.Mul(30,40);
}
In this example we have a class called Calc and it contains two methods : one is Add() to do addition and other is Mult() to find the product of two numbers. Taking the return statement into account, the Add() method returns a value to the main method while the Mul() method doesn’t return any value.
When you observe carefully, you can find that the data type of the method must be the same as the type of the value returned by that method. In the first case the Add() method returns an integer and hence the method data type is also int. Similarly in the next case no value is returned by the method, hence the method is assigned a datatype void. You will learn more about classes and methods in our upcoming tutorials.