

In the previous Golang tutorials by “learn eTutorials” you learned the basics of Go programming languages. We discussed the basics of Golang such as data types, variables, constants that are part of writing efficient code. In this tutorial, you will understand how decision-making is done in a Golang program using control flow statements like if/else, switches, and looping statements like for, range, etc. Also, we will discuss the syntax and flowcharts for decision-making statements.

A program is a piece of code where the control flows from one line to another line of code sequentially while in execution. This is the normal case of execution of a program when no flow of control is specified. In particular programs, control flows are mentioned where the interpreter executes the program based on some conditional statements. Thus control flow can be stated as the order in which the lines of codes are executed in a program. Control flow statements in Golang is further classified as decision-making statement and looping statement.
Next in this tutorial, you are going to learn different decision-making statements like only if, if-else, else-if, and Nested –if, etc…

Go condition supports comparison operators and logical operators.
| Comparison operator | symbol | Logical operator | symbol | |
|---|---|---|---|---|
| Less than | < | Logical AND | && | |
| Less than or equal | <= | Logical OR | || | |
| Greater than | > | Logical NOT | ! | |
| Greater than or equal | >= | |||
| Equal to | == | |||
| Not equal to | != | |||
| Less than | < |
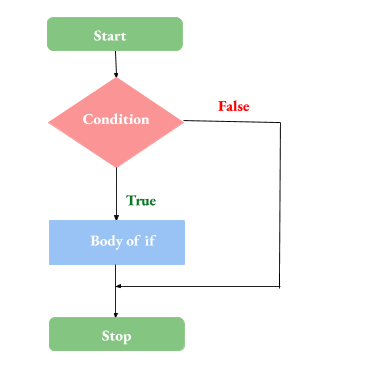
If condition {
//perform some instruction
}
package main
import ("fmt")

func main() {
  if 19 > 14 {
    fmt.Println("29 is greater than 14")
  }
}
Output:
29 is greater than 14
Another example showing multiple statements or conditions in an if statement. In the given example a is assigned a value say 45 which is compared against two numbers using && (logical AND)operator.
package main
import "fmt"

func main() {
    a := 45
    // mutiple conditions in if statement
    if a > 14 && a < 49 {
        fmt.Println("a satisfies the multiple if condition return true")
    }
}
Output:
a satisfies the multiple if condition return true
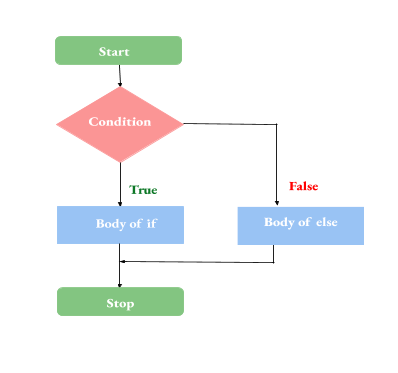
if condition {
//do some instructions
}else {
//do some instructions
Note: Compiler error is shown when else keyword is not in the same line followed by closing curly brace of the previous block.
Flowchart for the if-else statement
package main
import "fmt"

func main() {
    NUM1 := 15
    NUM2:= 27

    if NUM1 > NUM2 {
        fmt.Println(" NUM1 is greater than NUM2")
    } else {
        fmt.Println("NUM2 is greater than NUM1")
    }
}
Output:
NUM2 is greater than NUM1e
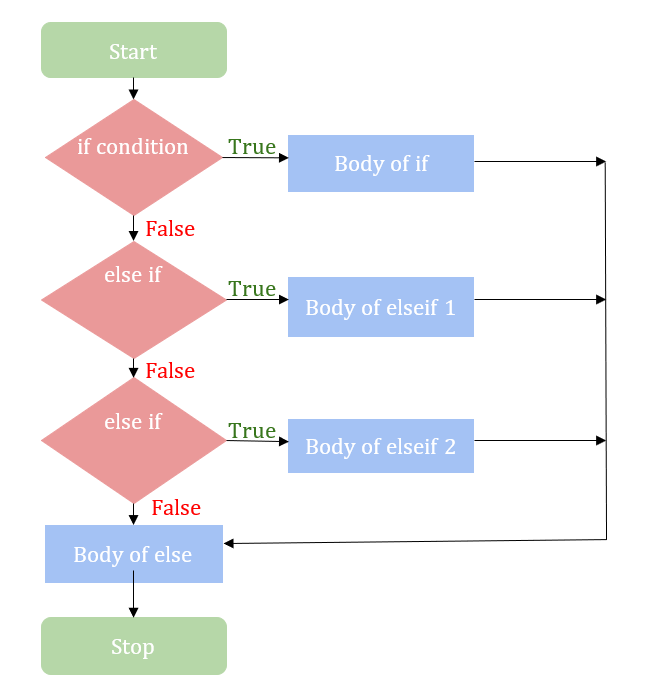
The syntax for if-else if the ladder is shown below :
If condition1 {
//do some instructions
}else if condition2 {
//do some instructions
}else {
do some instructions
}
Below is an example using an if-else if ladder that determines the cost of a product to which category it will belong like “low cost”,” feasible”,” Expensive”.
package main

import "fmt"

func main() {
    cost := 1000
    if cost < 250{
        fmt.Println("low cost")
    } else if cost>= 250 && cost < 400 {
        fmt.Println("feasible")
    } else {
        fmt.Println("Expensive")
    }
}
Output:
Expensive
Flowchart for if-else if ladder statement
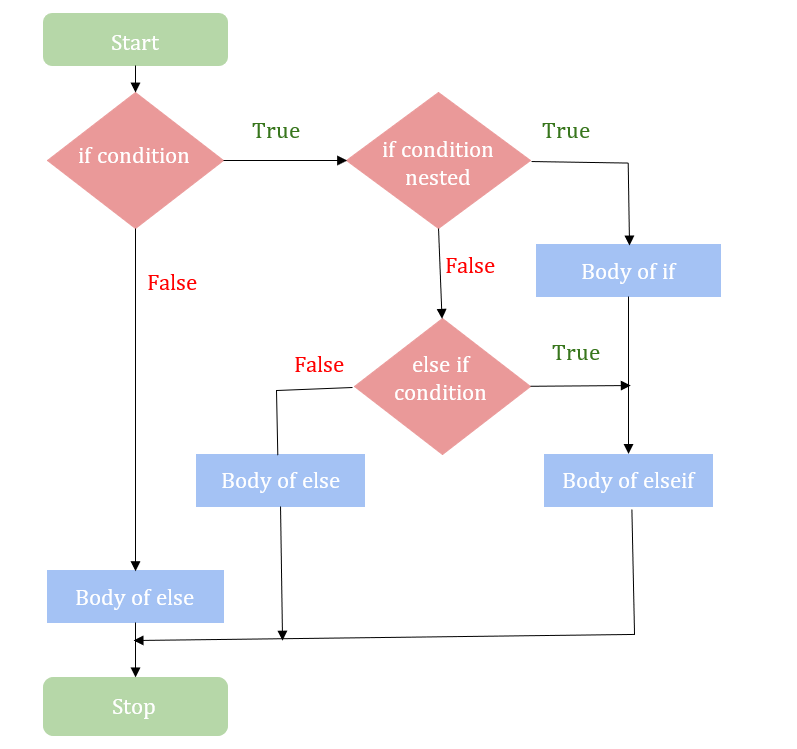
if statement which contains another if statements inside it enclosed within curly braces forms nested if statement.
if condition1 {
   // instruction gets executed if condition1 is satisfied
if condition2{
 // instruction gets executed if both condition1 and condition2 are satisfied
}
}else {
 //some other instructions
}
Flowchart for nested if
package main
import ("fmt")

func main() {
num1 := 35
if num1 >= 35 {
fmt.Println("Num1 >= 35.")
if num1 > 25 {
fmt.Println("Num1 > 25.")
}
} else {
fmt.Println("Num1 < 35.")
}
}
Output:
Num1 >= 35.
Num1 > 25.
A statement can be declared using shorthand notation before if condition as shown in below syntax. The statement is followed by a condition to be satisfied which further contains instruction to be executed. The instruction to be executed is given inside curly braces if the condition falls to be true.
Syntax :
If statement;condition {

}
Let us understand with an example
package main

import "fmt"

func main() {
    if j := 6; j > 5 {
        fmt.Println("j > 5")
    }
}
Output:
j > 5
Note: var keyword cannot be used instead of shorthand notation in a statement.
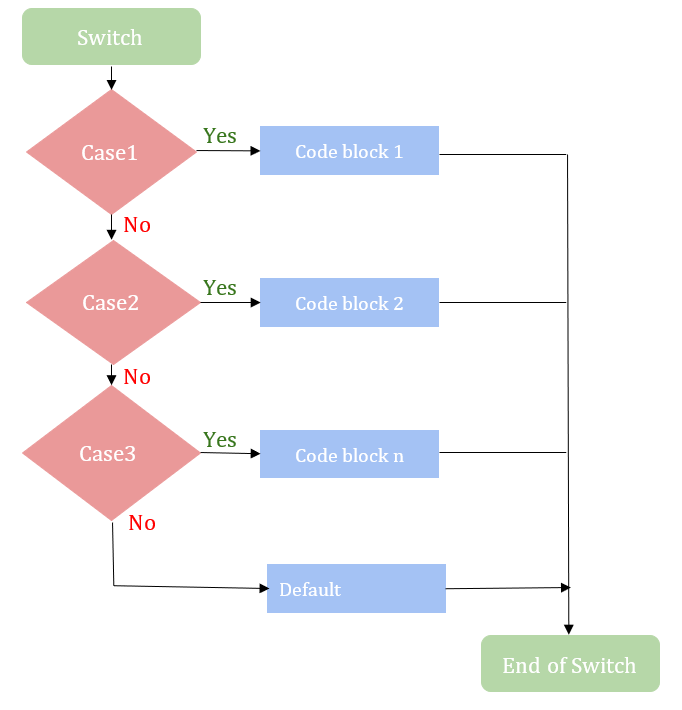
Golang supports switch statements as in any other programming language. An advantage of switching statements over another control statement (link to control statement) is to prevent multiple if statements in a program.
Let us start with the basic switch statement in Golang
Syntax
switch statement; expression {
case expression1:
     //Do some instructions
case expression2:
     // Do some instructions
default:
     // Do some instructions
}
The above syntax switch keyword defines that the statement follows a switch condition. The switch keyword is followed by a switch expression. The switch expression needs to be evaluated by matching with different corresponding cases provided within curly braces. The syntax can also be expressed in other forms as given below. In the above syntax switch, statements & expressions are given in a single line it is optional. They can be stated separately also according to the programmer's desire.
Let us see another switch syntax:
//SYNTAX 1
Switch statement ;{   // only with switch statement
case 1:
case 2:
default:
}
//SYNTAX 2
Switch  expression    // only with switch expression
case 1:
case 2:
default:
}
//SYNTAX 3
Switch {    // only with switch keyword
case 1:
case 2:
default:
}
Let us understand a basic switch with example
package main
import ("fmt")

func main() {
  months := 4

  switch months {
  case 1:
    fmt.Println("january")
  case 2:
    fmt.Println("february")
  case 3:
    fmt.Println("march")
  case 4:
    fmt.Println("april")
  case 5:
    fmt.Println("may")
  case 6:
    fmt.Println("june")
  case 7:
    fmt.Println("july")
  }
}
Output:
april
In the previous example, the switch expression evaluates case 4 because months(switch expression) is initialized with 4. So until it matches with case 4 compare with other cases. If no matching case is found out it switches to the default type.
Let us discuss the below example about how the default type is used during switching.
Program to check working of default type in switch
package main
import ("fmt")

func main() {
  months := 12//switch expression to evaluate

  switch months {
  case 1:
    fmt.Println("january")
  case 2:
    fmt.Println("february")
  case 3:
    fmt.Println("march")
  case 4:
    fmt.Println("april")
  case 5:
    fmt.Println("may")
  case 6:
    fmt.Println("june")
  case 7:
    fmt.Println("july")
  default:
  fmt.Println("no months defined")
 }
}
Output:
no months defined
In the above example months: = 12 is not evaluated, no match found with any of the cases given so prints default statement.
package main
import ("fmt")

func main() {

  switch months := 6;months {
  case 1:
    fmt.Println("january")
  case 2:
    fmt.Println("february")
  case 3:
    fmt.Println("march")
  case 4:
    fmt.Println("april")
  case 5:
    fmt.Println("may")
  case 6:
    fmt.Println("june")
  case 7:
    fmt.Println("july")
  default:
  fmt.Println("no months defined")

  }
}
Output:
june
Multiple values for different cases inside switch statements are possible. The switch cases are provided multiple values with which evaluate the given statement.
Let us understand with an example
package main
import ("fmt")

func main() {
 // multiple switch cases
  switch months := 7;months {
  case 1,2,3:
    fmt.Println("holiday")
  case 4,5:
    fmt.Println("working day")
  case 6,7,8:
    fmt.Println("weekend")

  default:
  fmt.Println("invalid case")

  }
}
Output:
weekend
So far we discussed the different control flow statements in the next tutorial you will learn how looping is achieved in Golang.